Friday, March 23, 2018

10 Essential Tips for Creating eBooks (EPUBs) in InDesign

By Grace Fussell


While print books will never lose their tactile appeal, eBooks have carved out their own lucrative niche in the publishing market.
If you’re looking to launch your first self-published book, or simply want to know a bit more about the basics of creating EPUBs (short for electronic publication) in Adobe InDesign, this is a great quick-start guide.

Tip #1: Use Publishing Software, such as InDesign

As a specialist publishing program, Adobe InDesign has always been the book designer’s software of choice when it comes to creating print books. InDesign also has excellent capabilities for EPUB design, with options that will help you create both fixed-layout and reflowable eBooks (skip to Tip 3 below to find out more).
Even though the current release of CC has been specifically tailored to accommodate the growing demand to have more EPUB-friendly features, you can also easily create EPUBs in CS5, CS5.5 and CS6 using the same basic techniques.
We’ll cover tips for creating EPUBs in InDesign in this article, but there are other software options available if you’d rather try something different or a little more budget-friendly. QuarkXPress and Microsoft Publisher have a similar interface to InDesign, while Scribus is a great free alternative, available for Windows and Linux.

Tip #2: Set Up Your Document for Digital Publishing

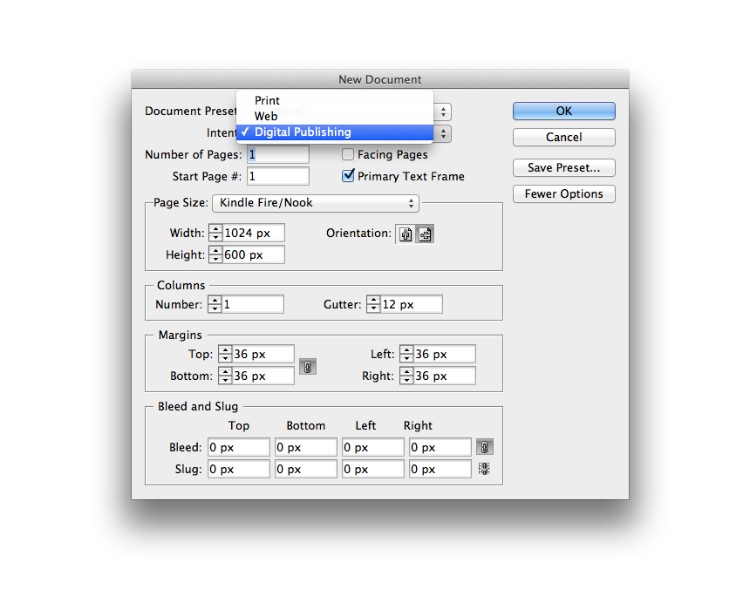
When you first open up InDesign, and go to File > New > Document, make sure to choose Digital Publishing from the Intent drop-down menu at the top of the window.
This will allow you to set the dimensions of your pages in pixels (px). InDesign will also suggest some default page sizes suitable for digital publishing formats, such as Kindle, iPad and iPhone.
If you’re creating a standard reflowable EPUB book (more about that below), you will also need to ensure the Facing Pages box is not checked.
10 Essential Tips for Creating eBooks (EPUBs) in InDesign - Digital Publishing
Tip #3: Choose a Reflowable EPUB Format…
There are two main formats for EPUBs, which you will have to choose between depending on the style of publication you are aiming for.
Most text-heavy books, like novels, will be set in a reflowable EPUB format.
A reflowable EPUB contains ‘live text’, which you can select, highlight and search. You can also change the size of the text and even the typeface in a reflowable EPUB. This will force the lines of text to expand and break onto other lines – to ‘reflow.’
This sort of format offers readers flexibility in terms of font size and improving navigation.

Tip #4: …Or a Fixed Layout Format

fixed layout EPUB has a ‘fixed’ design, meaning it doesn’t behave responsively. Instead it appears as it was intended by the designer, which makes it a better format for image-heavy eBooks and eMagazines.
If you want to add lots of images, diagrams, background color and interactive elements (such as video or animation) to your book, a fixed layout EPUB will be more appropriate.

Tip #5: Get Your Sizing Right

Reflowable EPUBs are designed to adapt to almost any screen size — their responsive format means that the book will be legible on any device, whether it’s an eReader, tablet, or computer.
If you’re creating a fixed layout EPUB, you will need to set particular dimensions (in pixels) for your pages, which will vary depending on the viewing device. So if you think most readers will access your publication on a tablet, for example, you should size your InDesign document to fit the most standard size of a tablet screen.

Tip #6: Organize Your eBook

One of the greatest advantages of eBooks over their printed counterparts is that readers can quickly and easily navigate through a book with a few swipes and taps.
To help your reader along, it’s important to organize your book before you export. If you’re working on a long book with a number of chapters or sub-sections, you can set up your InDesign document as a Book file (File > New > Book).
You can add individual chapters to this master book file (click on Add Document in the Bookwindow’s drop-down menu), and adjust the page numbering of your sections.
10 Essential Tips for Creating eBooks (EPUBs) in InDesign – Add Chapter
You can also use the Articles panel (Window > Articles) to arrange content in a particular order. For example, if it’s important that a certain image appears after a certain piece of text in the exported EPUB, you can use the Articles panel to set the order of text frame and image frame.

Tip #7: Create a Cover Image That’s Attention-Grabbing…and Doesn’t Blur or Warp

Every book needs a fabulous cover, but designing covers for eBooks is a little different from designing for hard copies. Generally eBook covers are viewed initially at small size as thumbnails on a store’s website. For this reason, the design needs to be optimized to attract casual browsers.
Give emphasis to the typography of your book, blowing up the title to an exaggerated size, and setting the text in a highly contrasting color to the background. Make sure the typeface is clear and easy to read, and conveys the genre of your book instantly.
Place the cover artwork either on the first page of your InDesign document, or create a separate image file, which you can set as the cover when you export your eBook.
Although we already mentioned how to size your eBook correctly in Tip 5, above, sizing your cover artwork is quite different. Different eBook stores set different cover size standards, so you will have to check in advance what their current recommendations are. Here you can find current cover size standards recommended by Amazon (Kindle), Apple iBooks, and Lulu. Note that these recommendations change frequently as eReader technology evolves, so make sure to check back often.
It can be easy to create eBook layouts in InDesign, but creating book covers might require more design skills. Try Shutterstock Editor for an intuitive, simple way to create book covers – add images and text, then customize further with filters, shapes, and more tools.

Tip #8: Keep the Typesetting Simple

Many fixed layout publications like eMagazines and image-heavy books will be read on a phone, tablet, or laptop. The light from these devices can strain the eye, and you also don’t want your reader to have to zoom in on the page just to be able to read.
=With this in mind, when you’re creating a fixed layout EPUB be sure to choose a highly legible font and make the font size and leading generous. In InDesign, you can adjust text formatting from the Character and Paragraph panels (Window > Type & Tables > Character/Paragraph).

Tip #10: Export to EPUB Format

Once you’ve created a cover, typeset the pages and organised the sections of your book, you’re ready to export your hard work as an EPUB file.
If you haven’t set up your document as a Book file, simply go to File > Export and choose EPUB from the Format drop-down menu.
If you’ve set up a Book file, choose Export Book to EPUB from the Book window’s drop-down menu.
10 Essential Tips for Creating eBooks (EPUBs) in InDesign – Export Book to EPUB
In the window that opens you can choose the Version for your EPUB (look up the version recommended by your eBook store of choice), and either Rasterize First Page or Choose Imagefrom the Cover drop-down menu.
10 Essential Tips for Creating eBooks (EPUBs) in InDesign – Choose Image Options
If you want to edit the resolution of images in your exported EPUB, click on the Image option in the left-hand menu and adjust the available options.
10 Essential Tips for Creating eBooks (EPUBs) in InDesign – EPUB Export Options
When you’re ready go ahead and click OK to create your exported EPUB.
Opting to produce your book as an EPUB instead of a print paperback or hardback has many advantages. If you’re a self-published author and you have no experience distributing books, EPUB is definitely the best format. EPUBs don’t need to be printed, so the cost of producing them is low — all you’ll need to do is purchase InDesign (or download a 30-day free trial from the Adobe website) and commit some time to designing.
When you’re done you can simply upload your book to one of many online eBook stores, and start sharing your book with the world!

Tuesday, March 20, 2018


Live Roads is a navigation app with HD

Maps, Lane-Level Navigation, and more


Live-Roads-navigation-app
If you have a mobile device, you’ve almost certainly used Google Maps or Apple Maps to get around town while driving. Live Roads is hoping to change things up with its mobile navigation app which features HD Maps and Lane-Level Navigation amongst other features for an enhanced navigation experience.
“Live Roads dramatically improves the most important aspects of your driving experience,” said Paul Konieczny, Founder and CEO of Live Roads. “It provides users with an innovative and intuitive app design that helps foster an incredible and immersive driving experience. With breakthrough features such as HD Maps and Lane-Level Navigation, users can enjoy this intuitive, easy, and fun application to assist them in navigating today’s complex and busy roads.”
In addition to an HD Maps option, which zooms you down to a rendered street-level view of your route, and Lane-Leven Navigation which shows which lane you’re currently driving in, other features include:
  • Picture-In-Picture (PIP) Maps: Users can see both HD and SD Maps at the same time for a higher level of detail and accuracy while driving
  • A 3D Car: Customizable 3D Cars, chosen from the available list of models and colors
  • Offline Maps: Access to unlimited downloadable maps in the US and Canada
  • Sharing Live Location with Friends: Users can share their drive, exact location and estimated time of arrival with other approved users as well as be able to input accidents, construction, and other incidents
  • Live Traffic Reports: All users have access to live traffic information at a glance. Quickly see the status of all roads in the vicinity
Live Roads is available for free on Android and is coming to iOS later this year. While the free version offers users standard maps and traffic updates with HD Maps and Lane-Level Navigation only when approaching a turn, the 99¢/month Premium HD service offers all of the app’s features including HD Maps, Lane-Level Navigation, 3D Car, PIP Maps, and Offline Maps. However, you don’t have to shell out to experience the Premium HD service as Live Roads offers a points system. Once users gain 10,000 Drive Points, they get a month of Premium HD for free. Drivers can earn Drive Points by simply driving with the app open or by reporting road incidents. In addition, free months can be earned when friends and family sign up to use the app.
We’ve been taking a preview beta version of the Android app (with the Premium HD features enabled by the folks over at Live Roads) for a spin over the last few weeks and, while it has potential, there’s still some work to be done. During the beta time, more features came online as the app came closer to launch, and more features are planned for the future. It was easy to toggle between SD and HD mode, as well as report accidents, construction, or police presence. Navigation directions worked fine as well during our testing and correctly mapped the quickest routes from point A to B.
While the app navigates fairly well for the most part, some of the issues we encountered included:
  • Orientation is off until you start driving, works best in a dash mount
  • Vehicle marker in both SD and HD mode often drifted off the road path
  • 3D car in HD mode didn’t always accurately reflect which lane you were in
  • Traffic volume not always visible in HD mode (Lane-Level Traffic coming soon)
  • No landscape mode (feature coming soon)
  • No way to properly position an accident, needed for roads with medians between them
  • Roads have sharp angles instead of curves like the actual roads
  • Basic naming of businesses, i.e. “Restaurant” instead of the restaurant name
As we found out, the app isn’t perfect as of yet and is still obviously a work in progress. It’s possible the business naming and road drifting is a result of my actual location here in Canada and hasn’t been updated or aligned properly as of yet being a smaller urban center but I had no issues with location placement when switching back and forth between Google Maps. I personally didn’t see any real advantage in the HD mode, but it was kind of fun having your vehicle represented along the road. Perhaps once Lane-Level Traffic is implemented, HD mode will be more useful for seeing which lane has the higher volume of traffic.

Monday, March 19, 2018


"A leader needs both the ability to formulate strategy and the skills to implement it"
                                                                                                       Robin Speculand                            

Saturday, March 17, 2018

Massdrop offers a Scrabble-themed mechanical keyboard


Scrabble-Key-FI

To date, you can find a variety of mechanical keyboards that could be what you’re looking for, such as one from HyperX or Logitech or anyone else but you may have never seen a Hasbro Scrabblemechanical keyboard before. This keyboard has been officially licensed by Hasbro and created by Cassidy Williams, a huge board game fan. Some keycaps that you can use to make it look more and feel like Scrabble are replacing the Enter/Return key with the Scrabble keycap or having the ESC key be a Star or having the number 3 key be the triple word keycap.
I’m a huge board-game fan, and I’ve been playing Scrabble with my family for as long as I can remember. Because my dreams are very literal, I once woke up from a dream where I had a keyboard that looked like a game of Scrabble, and I quickly mocked it up at like 2 in the morning. When I woke up again and realized that it wasn’t just a sleepy experience, but a potentially good idea, I started cold-calling as many people I could over at Hasbro to see if I could get it licensed. And here we are! –Cassidy Williams
You can purchase this keyboard now and expect a shipment date of September 4th, 2018. Full price with everything that is included comes to $159.99USD. Price may seem to steep for some, but it’s a fully customized keyboard with Cherry XM Brown switches and you’re getting a mass amount of custom keycaps.
What’s included:
  • WASD Code tenkeyless keyboard
  • Massdrop x Hasbro XDA Scrabble Custom Keycaps (Base Alphas, Modifiers, and Novelty kits)
  • USB cable
  • Keycap puller
  • PS/2 adapter
Specs:
  • WASD Keyboards
  • Case material: ABS
  • Keycaps: Scrabble XDA keycaps
  • Keycap material: dye-sublimated PBT
  • Switches: Cherry MX Brown switches
  • Rubber feet
  • 5-way cable routing
  • Onboard support for multiple keyboard layouts including QWERTY, Dvorak, and Colemak
  • LED indicators
  • Interface: USB / PS/2
  • Compatibility: Windows, Mac, Linux
  • Cable: 70.8 in (180 cm) micro USB to USB with cable tie
  • Dimensions: 14.3 x 5.6 x 1.2 in (36.3 x 14.2 x 3 cm) Weight: 2 lbs (907 g)
Although, the keyboard is cool and everything it may really lean towards one group of people: those who enjoy the game Scrabble and must have this keyboard. Now, that’s not to say people may purchase it regardless and try it out for themselves but not everyone will “have” to have this. What do you guys think about this new mechanical keyboard
Top WordPress Themes That Will Help You Create Award Winning Sites

img
Hestia
Hestia is a single-page design theme that adheres to Google’s Material Design principles. This makes it possible for web designers and website owners to adapt Hestia to virtually any niche.
img
Enfold
Enfold is a ThemeForest best-rated top seller, and as such is well known in WordPress web design circles. Especially noteworthy is Enfold’s large variety of demos.
img
Porto – Ultimate WordPress + Ecommerce Theme  
Porto has been around for several years, during which it has enjoyed increasing popularity; and for good reason. For many, Porto has been seen as simply being a better choice for new website design. 
img
TheGem – Creative Multi-Purpose High-Performance WordPress Theme   
TheGem is a versatile, responsive, high-performance WordPress theme with a modern creative design to suit a multitude of creative uses for building websites. 
img
Houzez – Highly Customizable Real Estate WordPress Theme
Building a website that has all the features and functionality a real estate agency requires, would normally be a daunting task. Not so with Houzez. 
img
Uncode – Creative Multiuse WordPress Theme
Uncode’s massive options, and advanced grid and adaptive images systems, make you the master. If you like “smooth and sleek”, you’ll surely like what this WP theme has to offer.
img
The Core
The Core is a premium, multi-purpose WordPress theme that is well-equipped to take on virtually any task you might demand of it. 
img
Grimag – AD & AdSense Optimized Magazine WordPress Theme
If you’re an AdSense user, or have contemplated using AdSense in your marketing campaigns, Grimag, the AD optimized Magazine WordPress Theme, is right for you.
img
MOVEDO – We DO MOVE Your World
This top-rated premium multipurpose WordPress theme will take you places in web design you’ve never been before, and you may not wish to return.
img
Anariel – A WordPress Fashion Blog Theme
This modern, classy WP Fashion theme is just the thing for a fashion blogger who prefers a minimalist design approach, and who wants to create a modern blog with plenty of options.
img
Real Homes – Real Estate WordPress Theme
Real Homes is a handcrafted WordPress theme for real estate websites with more than 4.7 out of 5 rating from 950+ real buyers. 
img
Leadinjection
Leadinjection is a WordPress landing page theme that is ideal for marketers, business owners, affiliates, and other professionals who have a need to launch landing pages within minutes. 
  There’s plenty of variety to choose from here. It does not matter if you’re looking for a premium multi-purpose WP theme or a specialty theme. You will also find or a theme that gives you a design capability or two that you never had before.

Morning Exercise